Creating a custom job posting
Jump to navigation
Jump to search
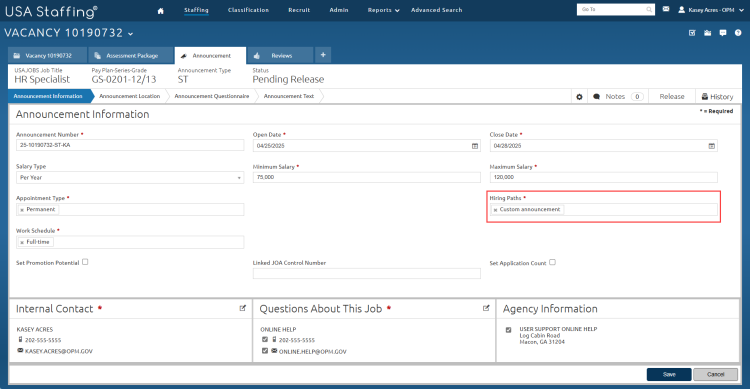
- Click the Announcement tab.
- Click Announcement Information.
- Enter the unique Announcement Number or click Generate.
- Select an Open Date from the drop-down calendar.
- Select a Close Date from the drop-down calendar.
- Select the Salary Type from the drop-down list.
- Enter the Minimum Salary.
- Enter the Maximum Salary.
- Select the Announcement Type from the drop-down list.
- Select Custom Announcement from the Hiring Paths drop-down list. Note: This enables the job posting will then be stored in USAJOBS but will not appear in USAJOBS searches.
- Select the Work Schedule from the drop-down list.
- If you selected Temporary, Term, or Temporary Promotion as the appointment type, enter the Not to Exceed date or time.
- If you selected Part-Time as the work schedule, enter the weekly Part Time Hours in the field.
- Check the Set Promotion Potential check box, if applicable.
- Select the promotion potential from the drop-down list, if applicable.
- Enter the Linked JOA Control Number if applicable.
- Check and enter a number to Set Application Count if applicable.
- Verify the Internal Contact section is correct. For instructions, see Editing an internal contact
- Verify the Questions About This Job section is correct. For instructions, see Editing an external contact.
- Verify the Agency Information section is correct. For instructions, see Editing the announcement customer.
- Click Save to continue. Once the Announcement Information page is saved, the Announcement Location, Announcement Questionnaire, and Announcement Text pages are enabled for editing.
- Continue building the announcement and release the announcement.
- Once the announcement is released, copy the job announcement number to share with the desired audience.
Note: The USAJOBS URL can be found on the Announcement Text page after the announcement is released, or it on the Vacancy - Case File page.
For more information, see: Custom Job Posting and USAJOBS Custom Job Postings.